TLDR;
in this blog post , we will build a File editor with version control features like saving a changes , logging the history of changes , track who made a change ,when and More .
we like Typescipt , we like the Web , so we will use Js frameworks in our development , React Js for the UI and NodeJs for our Backend application that will use File system API and Git .
Introduce Git : the Version control system (VCS)
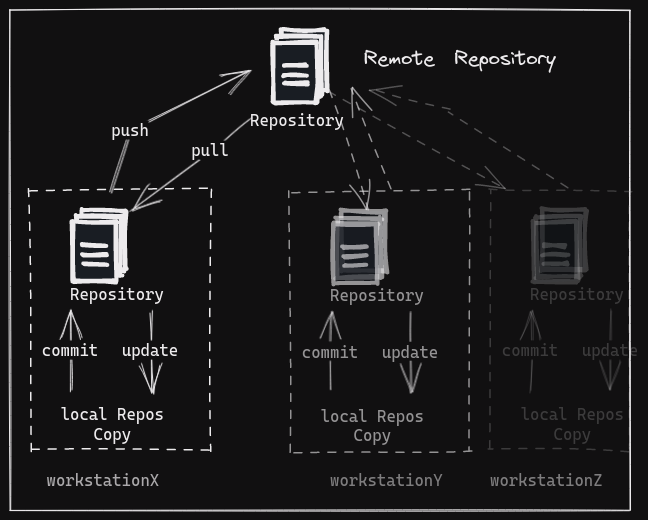
the term 'version control' may be new to some of us. in the contexte of this blog we are refering to version control systems. which is a type of software that enable teams of software developers to collaborate in writing into one source code, by providing features like tracking the history of changes that occures over time. who and when a changes was introduced , rollback to certain version. branching and more .
Git stand as the most popular VCS by far in the recent years due to it's many adventages including it's distributed approche. each collaborator can clone a local version of the central server without relaying on it's availability online . and can synchronize with the central server whether it's by pulling or pushing new changes. a local version has all the history of changes and banches.
For the sake of simplicity and to mantain the scope of this blog we will not deep dive into Git and just introduce some basic terms.
repository is a collection of files and their complete history of changes.
branch is a copy of a repository that allows developers to work on new features or bug fixes without affecting the main codebase.
Commits are changes made to a file or a group of files, and each commit is associated with a unique identifier called a hash.
Merging is the process of combining changes from different branches into one.
here we present the most used Git commands
- Pull: used to fetch and integrate changes from a remote repository into a local one.
- Push: used to upload local changes to a remote repository.
- Add: used to add new or modified files to the Git index (also known as staging), preparing them to be committed.
- Commit: used to record changes to the repository. It creates a new revision in the repository's history that represents the changes made to files in the repository. Each commit is identified by a unique hash code and includes a commit message that describes the changes made.
- Log: used to view the history of a repository, including all the commits that have been made, who made them, and when they were made. The log command can be used to view detailed information about each commit, such as the commit message, author, and changes made.
- Revert: used to undo changes made in a specific commit or range of commits, effectively reversing their effects.
- Show: used to display the details of a specific commit or the changes made to files in the repository. It is used to inspect the content and metadata . and can be useful for reviewing changes or debugging issues in a repository.
keep in mind that these git commands comes with some powerful sets of parameters that customize the behaviour of the commands,for example here is what we can use with Git log
--grep: searches for commits with a specific message or commit message pattern
--since/--after and --until/--before: filters commits by date or date range
--author: filters commits by author
-- $pathname: to query only the commit of specifique path directory or file.
Why Mentionning Git , Well .
you may say that the goal is to build a file editor with version control features but why mentionning Git , if you thought that we gonna build the same features as git or at least some of them the answer is you're wrong . and if you thought that we gonna use Git to help us in the process of development and collaborating you're wrong also . we mention Git because we gonna integrate it with our Nodejs backend application and benifite from it's powerfull commands to control the changes of the files that we will manipulate with our Nodejs File system API (we will explore it in the next section).
While we could interact with Git by running a child process to call the git command-line program . we prefere to use a dedicated library that facilitate the interface .a library like “simple-git” enhance our development experience by providing the simpilcity of usage ,the types safety and more .
here is some code samples using "simple-git" library.
initialise the repository
const git : SimpleGit= simpleGit(BASE_DIR, { binary: 'git' });
await git.init()
add some metadata
await git.addConfig('user.name', 'ayoub bouguettaya');
await git.addConfig('user.email', `author@foobarz.blog`);
stage the changes
await git.add('.');
commit the staged changes
await git.commit("first commit");
push the changes to the remote repository
await git.push("origin","main","--force")
Let's cook
we said that it's a file editor but no it's not that great idea , but we don't have too many options , we implemente a workspace
implemente a tree ; if someone is writing to a file , it's considered locked until it get realised .
File Editor
Node.js provides a File System module called 'fs', which allows us to communicate with the operating system's file system and perform all possible operations on files and directories.
The module provides both synchronous and asynchronous API( Promises based API was added in version control, in addition to the callback based API). The Promise-based APIs are preferred because they can make it easier to write asynchronous code that is more readable and less error-prone than callback-based code.
Please check the official nodejs documentation for more information. Below are some code samples,that illustrate how it's simple to create directory ,check file status ,read,write in files ect.
Import FS Promises-based methods
import { readFile, writeFile, mkdir, stat ,access} from 'node:fs/promises';
checking if the file exists .if it can't access it will throw an error.
await access(fullPath);
Read File
console.log(await readFile(fullPath, { encoding: 'utf8' }) )
write in file / overwrite of the content
await writeFile(fullPath, newContent)
create directory
await mkdir(directory, { recursive: true })
Let's Play with code
After introducing the concepts .we are going to build a small application to explore control versionning of a file in NodeJs. this application could be a starter application for ready production content management or document editor application that need’s collaboration and versioning features.
overview
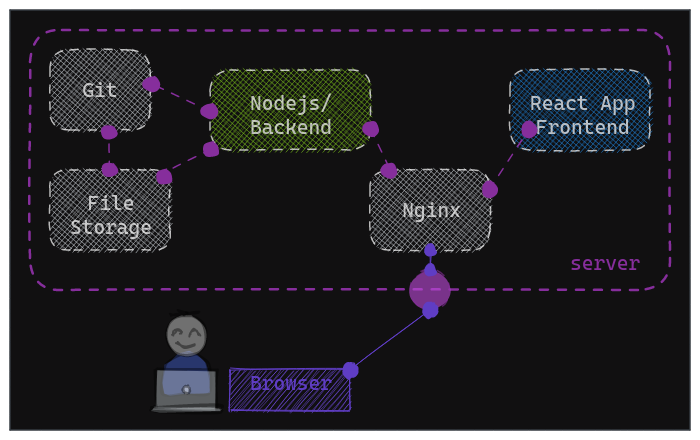
backend: this is the nodejs application that will handle the operation ,it will basically provide REST API .
frontend: this will be the ReactJs application that provide our user interface.
Git: the tool git need to installed in our machine.
file storage: we should have right access to read / write on file storage inside our machine .
Browser: this is where we will be playing.
The Backend Part
We will be using NestJs, which is a Node.js framework, and getting started with Nest CLI to scaffold the project and generate some boilerplate code
- controller class to define REST API Routing.
- service class to handle the Requests and Logics
Design our Rest API Endpoints
-
GET /data: the endpoint to get the Data in YAML format .by reading the file "setting.yaml" in the repos
-
POST /data: endpoint to save the data using File system Api 'writeFile' to the file path after that using the Git Commands in this order.
git add .to stage the changes of the file ,git committo record the changes staged for the file along with some meta data like the author ,comment and timestamps .
  async saveData(saveDataDto: SaveDataDto) {
    const { data, commitMessage, author } = saveDataDto;

    await writeFile(getFilePath(), data);
    await this.git.addConfig('user.name', author || 'unkown');
    await this.git.addConfig('user.email', `${author}@foobarz.blog`);

    await this.git.add('.');
    await this.git.commit(commitMessage);

    return data;
  }
- GET /commit-history: endpoint to get the list of git commit history of the file with pagination
async getCommitHistory(pagination: GetHistoryPaginationDto) {
    const {
      size = 10,
      page = 1,
    } = pagination;

    const query: string[] = []; // we can combine multiple queries like grep ,since ,after,author ect
    const fileName = getFilePath()

    const { total: totalCount } = await this.git.log<DefaultLogFields>([
      ...query,
      '--',
      fileName,
    ]);

    const { all: commits, total: pageLength } =
      await this.git.log<DefaultLogFields>([
        `--max-count=${size}`,
        `--skip=${(page - 1) * size}`,
        ...query,
        '--',
        fileName,
      ]);

    const maxPages = Math.ceil(totalCount / size);

    return {
      items: commits,
      pageLength: pageLength,
      page: page,
      maxPages: maxPages,
      size: size,
      totalCount,
    };
  }
- GET /data/:commitHash: the endpoint to get the file,changes,author and the comment linked to a commit hash.
  async getChangesAndDataStateByCommit(commitHash: string) {
    try {
      const pathfileName = getFilePath();

      const data = await this.git.show([`${commitHash}:${FileName}`]);
      const changes = await this.git.show([commitHash, '--pretty=format:%b', '--', pathfileName]);

    const { all: commits } =
    await this.git.log<DefaultLogFields>([
      `--max-count=1`,
      commitHash,
      '--',
      pathfileName,
    ]);

      const author = commits[0].author_name
      const subject = commits[0].message

      return { data, changes ,author,subject}
    } catch (error) {
      throw new Error(error.message);
    }
  }
The Frontend Part
Scaffold our react application with with Vite Js
yarn create vite frontend-app --template react-ts
then adding "react-router-dom" for our routing and create two pages
- The Home Page on
/ - The Commit changes Page on
/show/:commitHash
the HomePage is composed from 3 main components:
-
AuthenticatedUserPanel: this component is displaying the current authenticated user as a string and a form that allow us to change the authenticated user (which is just mocking move we are not handling any real authentication)
-
HistoricPanel: this component display the history of commits , eash commit has an author ,a message, timestamps and a unique Hash. for each commit item there is a possibiliy to show the details of the commit by ppresing on the "show" button which will redirect the user to
/show/:hash-commit -
Editor Panel: this component allow us to edit the content of the file in a sofisticated matter taking into consideration YAML format.thanks to '@monaco-editor/react' for the awesome Editor.
the Commit changes Page /show/:commitHash is composed with one main component:
using this library 'react-diff-view' we had easly able to display a nice looking Diff view to show the changes that was introduce by a given commit.
We reached The End 😎 hopefully you have found the post useful in someway. Now you can clone the project ,view the source code, make some changes as you explore the version control capalities with git ,run it in your machine and have fun with the application 🚀.
All the illustation used in this blog are my personel sketch on excalidraw.com, my references on system version control were essentially the officiel website of git , atlassian.com / bitbuckets blog ,and some awesome meduim / stackoverflow posts where i get to know the npm packages "simple-git" ,"react-diff-view" and "@monaco-editor/react"